🔥【pytorch】基本语法
🗓 2019年12月07日 📁 文章归类: torch
版权声明:本文作者是郭飞。转载随意,标明原文链接即可。
原文链接:https://www.guofei.site/2019/12/07/torch.html
可以参考 【pytorch】建立模型,提供了一个完整的最小神经网络构建过程,本文会对每个步骤做拆解和详细描述:
- 安装与配置。介绍安装、使用GPU等知识
- Tensor 的各种用法示例,包括各种函数、矩阵、统计运算
- 建立模型,包括
- 网络层、激活函数、卷积层 等
- 模型的 save/load
- 正则化
- 定义损失函数
- 定义优化器
- 训练
安装与配置
看CUDA版本
nvidia-smi
2.x的重大更新
# 编译,极大提升性能
model = torch.compile(model)

# torch.distributed、FSDP、DTensor 等能力持续改进

# Transformer 常用算子(如 attention 相关)和算子实现上持续优化
GPU
import torch
from torch import nn

torch.cuda.is_available() # 返回 True/False 表示GPU是否可用
torch.cuda.device_count() # 可用的GPU数量
使用GPU
device = torch.device("cuda:0" if torch.cuda.is_available() else "cpu")
# 'cuda' 等同于 'cuda:X',其中X是torch.cuda.current_device()
mytensor = my_tensor.to(device) # tensor
model = model.to(device) # 返回的 model 和输入的 model 是同一个对象,这个行为与下面的 tensor 不同

print(mytensor.device)
# 看模型在哪个设备上:(原理是看第一个参数所在的位置)
print(next(model.parameters()).device)
并行
# torch 默认不会做多显卡计算,用这个
model = nn.DataParallel(model)
# 目前替换:nn.parallel.DistributedDataParallel

# 设定这个之后,CPU占用会极大提高
torch.set_num_threads(num_physical_cores/num_workers)

# 加载并行
DataLoader(..., num_workers=args.nThreads)
- [性能相关的其它资料] https://zhuanlan.zhihu.com/p/69250939
Tensor
新建
torch.empty(5, 3)
torch.ones(3, 3)
torch.ones_like(...)
torch.zeros(5, 3, dtype=torch.long)
torch.eye(5)

torch.arange(start=0, end=8, step=2) # 含头不含尾
torch.linspace(start=0, end=9, steps=5) # 均匀的取5个值,含头含尾


# 随机生成
torch.manual_seed(2)         # 设置种子
print(torch.initial_seed())  # 查看种子
torch.rand(5, 3)             # 均匀分布 0~1
torch.randn(5, 3)            # 标准正态分布
torch.randn_like(x, dtype=torch.float)


# 从其它数据新建
torch.tensor([[5.5, 3],[2,3]], dtype=torch.float32)
torch.from_numpy(np.ones((5,5)))

# 说明:
# 1. 全部可以有入参 device=device,或者 device='cuda:0'
# 2. 全部可以用 dtype=torch.float32 指定数据类型,数据类型如下
# 3. 要在同一个 device 上才可以运行
device
device = torch.device("cuda:0" if torch.cuda.is_available() else "cpu")
# device 还可以是字符串: device = 'cpu' # device = 'cuda'

# 在 CPU 上生成,然后转到 GPU
x = torch.randn(4, 4).to(device)
# 在 GPU 生成,然后转到 CPU
x = torch.randn(4, 4, device=device).cpu()
# 也可以用 to(device) 转 CPU

# 说明:转换设备时发生数据复制
数据类型转换
x.int()
x.long()
x.float()
x.bool()
x.char() # int8 类型
x.double()

# 有这些类型(还有很多)
torch.bool
torch.int
torch.short
torch.uint8 # 这个是 ByteTensor
torch.int
torch.int8
torch.int16
torch.int32
torch.long
torch.float
torch.float16
torch.float32
torch.float64
torch.double
torch.complex32
torch.complex64
基本运算
# 四舍五入
a.round()
a.fix()
a.floor()


a + b
a * b    # 矩阵元素积
a @ b    # 矩阵积
a += 1

# 可以指定输出到哪个变量
result = torch.empty(5, 3)
torch.add(a, b, out=result)


# 大多数运算符后面可以加个下划线,表示替换运算
# 替换加
y.add_(x) # 这个会把加法的结果赋值给y
# 如 x.copy_(y), x.t_()

# 这些运算也可以不用符号,而是用函数表示:
a.matmul(b)
取数
a.size() # torch.Size([5, 3])
a.numel() # 共多少个元素

# index 和 Numpy 一样
a[:, 1]

# 获取某一行
a.select(dim=1,index=2) # 获取按照 dim 计算的 第 index 组。
# 例子的 dim=1 表示获取的是列,index=2 表示获取第 2 列


# tensor 转其它格式
a.numpy() # 转 np.array
a.tolist() # 转 list

# 转 Python 数字,只有单个元素的时候可以用
a[0][0].item()

# 注意一个特性: 共享内存
x = torch.ones(2)
y = x.numpy()
x += 1
print(x, y)
# 打印:tensor([2., 2.]) [2. 2.]

# 值得一提,反过来也是这个特性
a = np.ones(5)
b = torch.from_numpy(a)
a += 1
print(a, b)
# [2. 2.] tensor([2., 2.])
reshape
# reshape 也可以做下面这些事,但不能reshape到1维(?不知道为什么要这么设计)

a = torch.randn(4, 4)
a.reshape(2, -1)
a.reshape(-1)
数学运算
a.sqrt()
a.square()
a.exp()

# 指数运算
a.pow(-1.0)
a.pow(2.0)

a.cos()
a.cosh()
a.acos()
a.acosh()
a.arccos()
a.arccosh()
linalg
from torch import linalg

a = torch.rand(5, 5)


U, S, Vh = linalg.svd(a)
# full_matrices=False,可以提高性能

# 只返回特征值:
linalg.svdvals(a)

e_val, e_vec = linalg.eig(a)
linalg.eigvals(a)


# linalg 还有很多方法,例如:
linalg.norm
linalg.qr
矩阵操作
d = a.diagonal()           # 取出对角线
a1 = torch.diag_embed(d)   # 还原为对角矩阵

a.flip(dims=(0,)) # 按照 dims 确定的维度翻转

a.t() # 转秩


a.tril(k=0) # 下三角矩阵
a.triu(k=0) # 上三角矩阵

# cat
a = torch.rand(3, 2)
b = torch.rand(3, 2)

torch.cat([a, b], dim=0)

# 分割
a = torch.arange(0,12,step=1).reshape(2,6)
a.chunk(chunks=3, dim=1) # 尽量均匀分为三份
# 分为3份,大小分别是 1,3,2
torch.split(x, split_size_or_sections=(1, 3, 2), dim=1)
# 按 dim=1 分为3份,其大小分别为 1, 3, 2
where
torch.where(x1 > 0.5, x1, x2)
torch.clip(x1, min=0.4, max=0.6)
按位运算
# dtype 必须是 int 类型,最好是 uint8
x1 = torch.tensor([1, 2, 3], dtype=torch.uint8)
x2 = torch.tensor([1, 1, 1], dtype=torch.uint8)


x1 & x2  # 按位与
x1 | x2  # 按位或
~x1  # 按位非
x1 ^ x2  # 按位异或
# 以上对应的运算符为:x1.bitwise_or(x2) 等类似的东西

x1 << 1  # 移位运算
# x1.bitwise_left_shift(1)
逻辑运算
# 0 转为 False,别的数字都转为 True
x1 = torch.tensor([-0.9, 0, True, False], dtype=torch.bool)

# >、<、==、 >=、 <= 都可以
x2 = torch.rand(size=(4,)) < 0.5

# 逻辑与、或、异或、非
x1 & x2
x1 | x2
x1 ^ x2
~x1

# 其它方式:
# x1.logical_and(x2)
# x1.logical_or(x2)
# x1.logical_xor(x2)
# x1.logical_xor_(x2)
# x1.logical_not()
# x1.logical_not_()
统计类运算
a.mean()
a.mean(dim=1,keepdim=True)

a.sum()
a.sum(dim=1)

a.max()
values, indices = a.max(dim=1, keepdim=True)

a.min()
a.mode()

values, indices = a.sort(dim=1, descending=False)

a.argmin()
a.argsort()
a.argmax(dim=1, keepdim=True)

a.histc
a.histogram

a.std()
网络层
nn.Linear(16 * 5 * 5, 120)
激活函数
import torch.nn as nn
import torch.nn.functional as F
# 很多激活函数,在上面两个模块中是等价的,使用上的区别:
# nn 提供的是模块形式,适合放进 nn.Sequential
# F 提供的是函数形式,更灵活,适合条件调用、灵活的场景


# Module 方式
act = nn.ReLU(inplace=False)
y = act(x)

# Functional 方式
y = F.relu(x, inplace=False)
主要的激活函数:
nn.ReLUReLU(Rectifier Linear Unit), $\max(0,x)$nn.ReLU6是 hard-sigmoid 的变种 $\min(\max(0,x),6)$,移动端/量化友好nn.Sigmoid$1/(1+\exp(-x))$,优点是不容易出现极端只,但因为梯度消失问题,已经很少用了nn.Tanh$\dfrac{e^{2x}-1}{e^{2x}+1}$nn.Softsign是符号函数的连续估计$x/(abs(x)+1)$nn.Softplus是ReLU的平滑版 $\log(\exp(x)+1)$nn.ELUELU(Exponential Linear Unit) \(\begin{cases} x, & x>0 \\ \alpha\left(e^{x}-1\right), & x\le 0 \end{cases}\)
nn.Softmax(dim=dim)
torch.softmax(x, dim=1)    # 用于图片,对 channel 做 softmax
nn.LogSoftmax()  # 对 softmax 取对数,对应的损失函数是 NLLLoss

# 更现代的写法
nn.CrossEntropyLoss
# 等价于 nn.LogSoftmax + nn.NLLLoss
2019年5月22日更新(来自吴恩达的 DeepLearning.ai 课程):
- sigmoid: never use, except output layer
- tanh: pretty much strictly superior then sigmoid
- ReLU: if you do not know which to choose, always choose ReLU
- Leaky ReLU: you may try this $max(0.01z,z)$
激活函数的微分
- sigmoid:$g(x)=\dfrac{1}{1+e^{-z}},g’(z)=g(z)(1-g(z))$
- tanh:$g(x)=\dfrac{e^z-e^{-z}}{e^z+e^{-z}},g’(z)=1-(g(z))^2$
- ReLU/Leaky RelU: 分段函数,注意0点的情况(但0点不是很重要)
卷积相关
import numpy as np
import torch
from torch import nn

conv_1 = nn.Conv2d(
    in_channels=1
    , out_channels=16
    , kernel_size=(5, 5)
    , stride=(1, 1)
    , padding='same'  # 或者 padding=2
)

# 显示卷积核的值
conv_1.weight

# 可以给它赋值
filter_1 = torch.from_numpy(np.ones((16, 1, 5, 5)))
conv_1.weight = torch.nn.Parameter(filter_1)
Pool
nn.MaxPool2d(kernel_size=2)


# 还有:
# nn.Conv1d, nn.Conv2d, nn.Conv3d
# nn.MaxPool, nn.MaxPool2d, nn.MaxPool3d
建立模型
import torch
import torch.nn as nn
import torch.nn.functional as F
from collections import OrderedDict


class MyNet(nn.Module):
    def __init__(self):
        super(MyNet, self).__init__()

        # 方法1:最常用
        self.fc1 = nn.Linear(10, 10)
        # 方法2:动态命名,尽量别用
        self.add_module("fc2", nn.Linear(10, 10))
        # 方法3:
        self.block3 = nn.Sequential(OrderedDict([
            ("conv1", torch.nn.Conv2d(in_channels=1, out_channels=16, kernel_size=(5, 5))),
            ("relu1", nn.ReLU())
        ]))
        # 方法4:
        self.add_module("block4", nn.Sequential(OrderedDict([
            ("conv1", torch.nn.Conv2d(in_channels=1, out_channels=16, kernel_size=(5, 5))),
            ("relu1", nn.ReLU())
        ])))

    def forward(self, x):
        x = F.relu(self.fc1(x))
        x = F.relu(self.fc2(x))
        # forward 中不加入就不起作用
        # x = self.block3(x)
        # x = self.block4(x)
        return x


my_net = MyNet()
print(my_net)
如何使用模型
x = torch.randn(8, 10)

y = my_net(x)
保存和载入模型
# 存
torch.save(my_net.state_dict(),'./model.pkh')

my_net1 = MyNet().to(device)
# 读
my_net1.load_state_dict(torch.load('./model.pkh', weights_only=True))
# weights_only 只加载权重,更安全

# 关于 device 的说明:
# 1. state_dict 时,会连同所在设备号一起保存;在 load 时,会 load 到对应的设备上
# 2. 使用 map_location 可以指定 load 到哪个设备上
# 3. my_net1.load_state_dict(xxx) 时,会加载到 my_net1 所在的设备上。无论 load 时这些 tensor 在哪个设备上

# 指定参数 load 到哪个设备上:
device3 = torch.device("cuda:3")
torch.load('model.pkh', map_location=device3, weights_only=True)

# 或者
troch.load('model.pkh', map_location={"cuda:1":"cuda:0"})
连同训练状态一起保存,以便断点续训
# 保存
ckpt = {
    "epoch": epoch,
    "model_state": model.state_dict(),
    "optim_state": optimizer.state_dict(),
    # 可选:
    # "sched_state": scheduler.state_dict(),
    # "scaler_state": scaler.state_dict(),   # AMP 用
}
torch.save(ckpt, "ckpt.pth")

# 加载
model = MyNet().to(device)
optimizer = torch.optim.Adam(model.parameters(), lr=1e-3)

ckpt = torch.load("ckpt.pth", map_location=device)
model.load_state_dict(ckpt["model_state"])
optimizer.load_state_dict(ckpt["optim_state"])

start_epoch = ckpt["epoch"] + 1
model.train()
for epoch in range(start_epoch, num_epochs):
    ...
safetensors: 更快、更安全、更标准的 tensor 保存格式
# pip install safetensors

# 保存
from safetensors.torch import save_file

state = my_net.state_dict()
save_file(state, "model.safetensors")

# 读取
from safetensors.torch import load_file

state = load_file("model.safetensors", device='cuda:1')  # 默认在 CPU,可以指定设备
my_net1 = MyNet()
my_net1.load_state_dict(state)
训练配置的开启和控制
# 切换到训练模式:开启 Dropout、BatchNorm 等
model.train()

# 切换到评估/推理模式:关闭 Dropout,BatchNorm 用训练时记录的
model.eval()

# 不记录计算图、不计算梯度,用于评估/推理
with torch.no_grad():
    ...
关于 with torch.no_grad():
x = torch.randn(3, requires_grad=True)
y = x * x
print(y.requires_grad) # True
with torch.no_grad():
    print(y.requires_grad) # True
    y2 = x * x
    print(y2.requires_grad) # False

print(y.requires_grad) # True
print(y2.requires_grad) # False
或者使用 y = x.detach() 生成的是数据共享内存,但指定不微分的新 Tensor
AUTOGRAD
requires_grad 用来控制其是否产生梯度
# 方法1
x = torch.ones(2, 2, requires_grad=True)
# requires_grad 默认为 False

# 方法2
x = torch.ones(2, 2)
x.requires_grad = True
y = x + 2
# y.requires_grad 为 True
# y.grad_fn 非空
案例:
y = x + 2
# 只要 x.requires_grad == True,那么对 x 的大多数运算都符合:
# y.requires_grad 为 True
# y.grad_fn 非空
z = y * y * 3
k = z.mean()
# 同上,z.requires_grad 和 k.requires_grad 都是 True
x.requires_grad如果设定为 Ture,后面用到y的变量都会计算梯度y.grad_fn是与梯度计算有关的函数
# 求导数
k.backward() # 开始计算梯度
print(x.grad) # 返回梯度值
# 1. 返回 dk/dx_ij,形式是矩阵
# 2. 只会给出叶子的导数。所以 z.grad 没有值。因为计算这个值往往意义不大
# 3. 如果确实需要 z.grad,提前声明 z.retain_grad()

x.is_leaf, y.is_leaf # (True, False)
要点:
k.backward()只能运行一次k.backward(retain_graph=True)可以运行多次,但结果为上一次的累加,(会导致内存占用较多?)
开关梯度计算
x = torch.ones(2, 2, requires_grad=True)

# 方法1. 使用 with
with torch.no_grad():
    y = x + 2

print(y.requires_grad)  # False

# 方法2. 使用装饰器
@torch.no_grad()
def func(x):
    return x + 2


y = func(x)
print(y.requires_grad)  # False

# 相反的运算是 torch.enable_grad(),可以嵌入到 no_grad() 代码块里面
# 如果 x 本身没有设置 requires_grad=True,那么即使 enable_grad(),它也不生效

# 方法3. 全局打开/关闭
torch.set_grad_enabled(True)
torch.set_grad_enabled(False)
# ???
# 如果 out 是一个 tensor 数据类型的矢量,那么这样
v = torch.tensor([1.0, 2, 3])
y.backward(v)
# ???但我没搞清楚这个对应哪个数学公式
正则化
l2正则化
# l2 正则化适合用 AdamW,并且 weight_decay 就是 l2 正则化的参数
optimizer = torch.optim.AdamW(model.parameters(), lr=1e-3, weight_decay=1e-4)


# 第二种写法(如果想要更精细控制):
# l2 正则化建议作用于 bias,因此分两组
weight_p, bias_p = [], []
for name, p in my_net.named_parameters():
    if 'bias' in name:
        bias_p += [p]
    else:
        weight_p += [p]

optimizer = torch.optim.SGD([{'params': weight_p, 'weight_decay': 1e-5},
                             {'params': bias_p, 'weight_decay': 0}],
                            lr=1e-2,
                            momentum=0.9)

# l1 正则化也需要手动写
Dropout 用来减轻 overfitting
nn.Dropout(p=0.5) # p 是丢弃概率


# 以下会按 channel 丢弃整条 channel:

# 输入 (N, C, L) ,随机把某些 整条通道 C 全部置 0 (该通道上的所有 L 位置为0)
nn.Dropout1d

# 输入(N, C, H, W),随机把某些 整条通道 C 全部置 0 (该通道的 H×W 全部为 0)。典型用在:2D CNN(图像)
nn.Dropout2d

# 输入 (N, C, D, H, W):随机把某些 整块通道 C 置 0(该通道的 D×H×W 全为 0)。典型用在:3D CNN(视频、医学影像体数据)
nn.Dropout3d
Batch Normalization
nn.BatchNorm1d # 针对 2 维或者 3 维,输入是 (N, C), 或者 (N, C, L)
nn.BatchNorm2d # 针对 2 维,输入 (N, C, H, W)
nn.BatchNorm3d # 针对 3 维,输入 (N, C, D, H, W)
# 其中,N 是 batch size


torch.nn.BatchNorm1d(num_features=5, eps=1e-5
                     , momentum=0.1, affine=True, track_running_stats=True, device=None, dtype=None)
# num_features:二维(N, D) 中的 D,BatchNorm2d 中的 C
# eps:防治除0错误
# momentum 动态均值和动态方差所用的动量
# affine 自适应调整 gamma/beta 值,若为 False 则不用它们
# track_running_stats=True 不但追踪当期的均值和方差,还根据之前批次做调整
$y = \dfrac{x - \mathrm{E}[x]}{\sqrt{\mathrm{Var}[x] + \epsilon}} * \gamma + \beta$
BN不能紧跟着dropout,否则会抖动严重
损失函数
- 交叉熵,适用于分类,$H(p,q)=-\sum p(x)\log q(x)$
criterion = nn.CrossEntropyLoss() nn.CrossEntropyLoss(weight) # 加权交叉熵,针对类别数量不均衡的情况 - MSE,适用于回归,$MSE(y,\hat y)=1/n \sum (y-\hat y)^2$
criterion = nn.MSELoss() criterion = torch.nn.L1Loss() # 这个对应的是 MAE,平均绝对误差 - 自定义。例如,预测销量时,多预测一个损失1元,少预测1个损失10元。
$Loss(y,y’)=\sum f(y_i,y_i’)$,
其中,\(f(x,y)=\left\{\begin{array}{ccc}a(x-y)&x>y\\ b(y-x)&x\leq y\end{array}\right.\)def asym_l1_loss(y_pred, y_true, a=1.0, b=10.0): # over: y_pred > y_true over = (y_pred - y_true).clamp_min(0.0) under = (y_true - y_pred).clamp_min(0.0) return (a * over + b * under).mean() - 多标签二分类任务中的损失函数,每个预测值有 n 个 0/1
nn.BCELoss
nn.BCEWithLogitsLoss
优化器
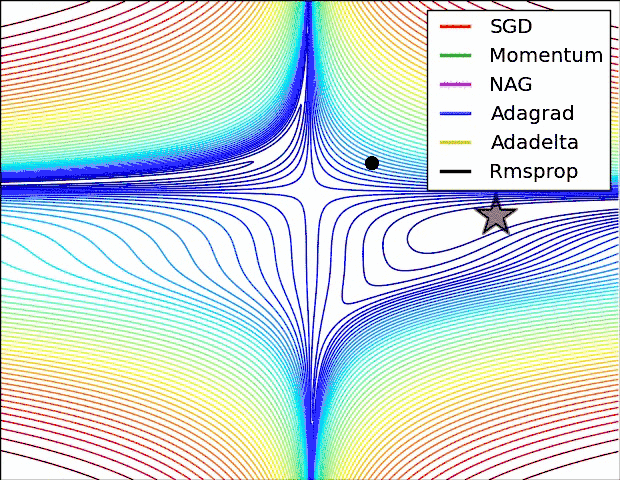

torch中的优化器
optimizer = torch.optim.SGD(my_model.parameters(), lr=learning_rate)
optimizer = torch.optim.Adam(my_model.parameters(),weight_decay =1e-3) # weight_decay 是 L2 penalty
适用性
- SGD 对尺度很敏感,因此必须做标准化
学习率
学习率衰减
# 等间隔调整
scheduler = torch.optim.lr_scheduler.StepLR(optimizer, step_size=7, gamma=0.1)
# 按步调整
torch.optim.lr_scheduler.MultiStepLR

# 指数衰减 lr * (gamma ** step)
torch.optim.lr_scheduler.ExponentialLR

# 余弦退火,学习率按余弦衰减
torch.optim.lr_scheduler.CosineAnnealingLR

# 指标在近几次没有变化时,调整学习率,最常用
scheduler = torch.optim.lr_scheduler.ReduceLROnPlateau \
    (optimizer=optimizer
     , mode='min'
     , factor=0.5  # gamma
     , patience=5  # 监控不再减少/增加的次数
     , verbose=True  # 触发规则后打印
     , threshold=1e-4  # 触发规则的阈值
     , threshold_mode='abs'  # 触发规则的计算方法
     , cooldown=0  # 触发规则后停止监控这么多次
     , min_lr=0  # lr最小是这么多
     , eps=1e-8
     )

# 自定义 学习率衰减
torch.optim.lr_scheduler.LambdaLR
如何使用?
# 训练阶段,前面一堆代码
optimizer.step()
scheduler.step()
# 后面一堆代码
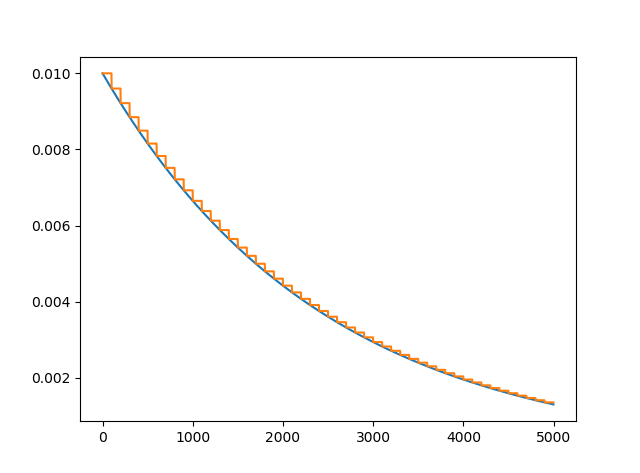
画一个学习率衰减图
optimizer = torch.optim.Adam(my_net.parameters(), lr=0.1)
# scheduler = torch.optim.lr_scheduler.StepLR(optimizer, step_size=20, gamma=0.5)
scheduler = torch.optim.lr_scheduler.ExponentialLR(optimizer, gamma=0.96)

lr_history = []
for i in range(100):
    scheduler.step()
    lr_history.append(optimizer.state_dict()['param_groups'][0]['lr'])
其它常见问题
torch.get_default_dtype()
torch.set_default_dtype(torch.float16)


torch.ByteTensor([1.1, 2, 3]) # 对于小数,会取整。对于溢出的数(大于255或负的),会舍弃溢出位数
# 但是,如果输入的是Tensor,会卡死,这么解决:
torch.tensor([1, 2, 3]).type(torch.int8)
hook
# 正向时会触发的hook
def func1(model,input,output):pass
my_net.register_forward_hook(func1)
# 反向时会触发的hook
def func2(model,grad_input,grad_output):pass
my_net.register_backward_hook(func2)
显存不够
如果模型太大,一个batch未必能放进去显存。解决:把一个 batch 分割运行,把梯度累积起来,n次后更新一次
accumulation_steps = 5  # 累积5次,然后更新一次权重

for i in range(1000):
    loss = loss_func(pred, y)
    loss = loss / accumulation_steps
    loss.backward() # 计算 loss
    if (i + 1) % accumulation_steps == 0:
        optimizer.step()  # 参数更新
        optimizer.zero_grad()  # 清空梯度
另一种情况,如果有两个独立的子任务,尽量独自前向传播
# 不要这样:
loss = loss1 + loss2
loss.backward()

# 而是这样:
loss = loss1 + loss2
loss1.backward()
loss2.backward()
您的支持将鼓励我继续创作!